How to Bulk Upload Upc for Products Prestashop
Introduction
In many cases, especially when migrating products from other Opensource platforms a store owner might demand an option that will allow the bulk export/import of products since doing it manually product by product is severely time-consuming. In this context, the major E-Commerce platforms take adopted the usage of common file type which allows the storage of multiple products separated past a certain delimiter. This file format is called CSV and in the side by side steps of this tutorial, nosotros will show you how to properly apply the majority import functionality of Prestashop.
Technical Explanation of the CSV file format
A comma-separated values (CSV) file is a text file that uses commas to separate values. A CSV file stores data similar numbers and text in plain text. Each line of the CSV file is a information record. The use of the comma as a field separator is the source of the name for this file format. The term CSV too denotes some closely related delimiter-separated formats that use different field delimiters such as semicolons. They include tab and space-separated values. These alternating delimiter-separated files are frequently even given a .csv extension despite the apply of a non-comma field separator. This loose terminology can crusade problems in data exchange. Many applications that accept CSV files have options to select the delimiter character and the quotation character.
Step 1: Accessing the Import page
To exist able to bulk import products using CSV file you will showtime have to access the "Import" page of Prestashop. To do that you have to login to the PrestaShop admin expanse and from the left vertical navigation card wait for the "Advanced Parameters" selection. Once y'all find it, please, click on it. A drop-down menu will appear with the options "Information", "Performance", "Assistants", "Import" and and so on.

From the drop-down menu, please, click on the "Import" link to access the "Import" page.
Step two: Construction of the Import page
In that location, you will exist presented with all the sections that demand to exist filled out in order for you lot to actually import products from CSV files.
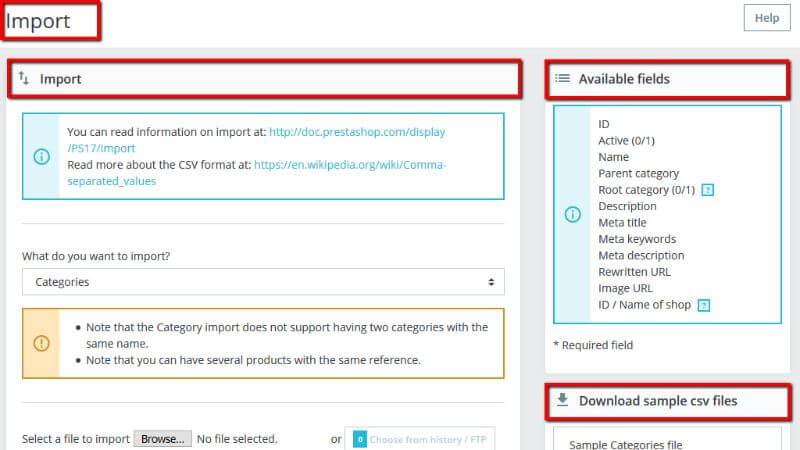
The "Import" page is divided into three sections. The biggest one is positioned on the left side of the page and it is called "Import".

In that department, you are presented with all the steps yous have to gear up every bit primary settings for the import of a product with CSV files. You will larn more than about it in the next stride.
Side by side, is the "Available fields" section. You will find that on the meridian right side of the page.

As the name suggests that section contains all of the available fields, such as:
- "ID"
- "Active (0/i)"
- "Proper noun"
- "Parent category"
- "Root category (0/1)" and so on.
Please, carry in mind, that the content of the Available Fields section will vary depending on the fields that the CSV file has.
Although the importing tool helps you by taking care of matching the CSV file'south fields with the ones in PrestaShop, it is adept if you strive to make your data more import-friendly by following the naming scheme and guild of the presented fields. Otherwise, the import will be harder to attain, only non impossible. Delight, pay attention, that some fields accept a piffling information popup available (represented past a "?" sign), which you can browse past clicking on it.

They are mostly connected to PrestaShop's multistore functionalities or advanced stock direction characteristic. Please, brand sure you read them all in gild to better build/edit your data files.
At that place are "Sample CSV" files provided by PrestaShop. They are stored in the "Download sample CSV files" department.

In that department, you tin notice sample downloadable files for:
- "Categories"
- "Products"
- "Combinations"
- "Customers" and then on.
By clicking the file itself, you will download information technology on your figurer. If you are curious and open that file, typically, with some table management software like Excel, for instance, you will notice how all the information is conveniently structured in a table view.

Yous will notice that the columns in the table view are the same as the displayed in the "Available fields".
Step 3: Utilizing the "Import" section on the "Import" page
At present, let's head to the bodily process of importing products using the .CSV files. It requires preparation and starts with a course for the primary settings:
- "What do you want to import" - In that section, at that place is a driblet-down menu. Cull from it what kind of entity you would similar to import to your shop.

The "Available fields" on the correct updates when you choose an entity. This way you know the kind of data that your import file should incorporate. PrestaShop gives you the selection to cull the following types of data for import:
- "Categories"
- "Products"
- "Combinations"
- "Customers"
- "Addresses"
- "Brands"
- "Suppliers"
- "Aliases"
- "Supply orders" (if Advanced Stock Direction is enabled)
- "Supply order details" (if Advanced Stock Management is enabled)
- "Store contacts"
Since in this tutorial we are aiming to import products, permit'south choose the Products option.

- "Select a file to import" - You can import more than than one file at a time, but make sure that they all comprise the same type of data.

You lot can either upload files from your computer or choose files already available on your FTP or in the history section of Prestashop. Please, bear in mind, that all immune formats are the following: .csv, .xls, .xlsx, .xlst, .ods, .ots. Only UTF-8 and ISO 8859-1 encodings are immune.
You can likewise download sample files for each blazon of data from the "Download sample CSV files" section on the correct. Doing that helps you to compare the sample files with your own files. This style you tin make sure that the files you are about to import are actually fix to be imported to your PrestaShop Online Store. These files are actually stored in the /docs/csv_import folder of your PrestaShop installation.
The side by side option in the "Import" section is well-nigh the languages that the files are on.
- "Language of the file" - Data can only be imported for a single language at a time. If your data exists in more than i language, you should separate it into multiple CSV files.
- "Field separator" - Not all CSV files use commas to separate their values: some utilize tabulations, other semicolons, etc. Yous tin indicate how the products in your CSV file are separated in this field.
- "Multiple value separator" - When an attribute can support more than one value, these values need to be separated with a specific separator. Once you review your files, please, indicated the separator in the field.
- "Delete all products earlier import" - With that pick, you can cull if you want to delete all the existing products and start with a clean country. If the entries of the type of information you are importing are different than products, similar for instance, you are importing categories, then that field volition be called "Delete all categories before import".
- "Use production reference as central" - That field appears for production import but. You can cull to have the product key to be determined past PrestaShop, or instead, use the product'southward reference as the ID. In this case, make certain the file does contain references for all your imported products.
- "Skip thumbnails regeneration" - That field is available for a category and product import merely. You tin choose to have PrestaShop regenerate the thumbnails that are linked from your CSV file (in the "Image URL" or "Image URLs" fields). Please, behave in mind, that disabling the "Skip thumbnails regeneration" option when importing products volition brand PrestaShop generate thumbnails and that can accept a lot of time, which may cause time-out in the importation script.
- "Force all ID numbers" - You tin either go on the imported IDs or let the importer auto-increment them. Please, bear in mind, that enabling this choice volition keep your imported items' ID number as they are. If you lot choose to disable this option, the imported ID numbers will exist ignored, and PrestaShop will instead create auto-incremented ID numbers for all the imported items. If you get an error while importing, merely enable the "Force all ID numbers" option. If you apply reference as key, you need to enable the "Use product reference every bit key" option as well.
- "Send notification email" - If you are importing large files, actuate this option to receive an electronic mail when the import is complete.
Once you have filled out all your products in the CSV file, y'all tin can upload them to your Online Shop using the "Select a file to import" option on the "Import" page. When the file is uploaded and y'all are done configuring the bones options for importing a production using the CSV file, please click the "Next step" button at the bottom of the page.

Please, bear in mind, that all import files are uploaded directly in the admin folder's /import sub-binder. If the file driblet-downwardly menu gets way too big, you tin can delete old imports direct using your FTP client.
When y'all click the "Next step" push, you will exist redirected to a page with the data matching tool.
On that page, y'all tin actually friction match your file's data columns with the ones required past PrestaShop. In a structured tabular array view, yous volition be presented with all the columns added in the information file that you created. They will be placed under the arbitrary columns matched to PrestaShop'southward database needs.

It is up to you to brand sure that all the columns from your CSV file match the correct cavalcade header. You can do that by using each header's drop-downwardly selector, in gild to import your content correctly.

For case, allow's use the sample file.
- "First column" - We marked it equally "Active", PrestaShop presents "ID" as a header. Click on the header'due south drop-down menu, and select "Active (0/1)".

Since that column does not match the PrestaShop requirements for importing CSV file you will have to click on the header'south drop-down menu and select "Active (0/1)". That way you will bespeak if you want that cavalcade to exist skipped by PrestaShop or no. In order to skip the text-field, please, enter i in the "Rows to skip".

- "Second column" - Marked "Proper name", the header indicates "Active (0/1)". Let's modify the header for "Name *" and so on.
When yous set these 6 columns that you are presented with on the screen, please, click the ">" and "<" buttons at the lesser of the page to see the other columns. Delight, make certain you match the columns correctly.

After y'all are washed matching your columns with the PrestaShop ones, click the "Import" push at the correct bottom of the page.

When you click the "Import" button PrestaShop volition start the importing process. A pop-upwards window will announced to show you the progress of the import. If your file is matched properly then once the process is washed, you should see "100% validated and 100% imported" characterization. By endmost that pop-upwardly window you will be redirected to the main screen. If there is an error that occurs during the import you will exist presented with a notice of all the encountered issues. If that is the case y'all should review your file and make sure to correct everything.
The matching process tin can be a tedious task if yous cannot customize your file columns order according to that used past the PrestaShop importer, and even more so if you have to do that repeatedly or oft. For that PrestaShop includes a small field that allows you to salvage the electric current matching configuration.

The tool is a uncomplicated field at the top of the matching tool. Delight, bear in mind, that if there is no matching configuration saved yet there volition be only ane field, but if you had already saved the configuration and then iii fields with basic actions will announced. They are as follow:
- "Saving" - Enter a descriptive name in the field, and click "Save". The interface updates to feature the saved configuration in its driblet-down listing.
- "Loading" - Select a matching configuration in the driblet-downwardly list, and click "Load".
- "Deleting" - Select a matching configuration in the drop-down list, and click "Delete".
Managing products by using CSV files is recommended, even though you may find information technology is not that easy at the commencement, as the fourth dimension goes by, you will detect that using CSV files to manage product data is saving a lot more fourth dimension.
Congratulations! Today you learned what is the meaning of a CSV file, why it is good to employ it and how to manage the products in your Online Store with such type of files.
Source: https://hostarmada.com/tutorials/e-commerce/prestashop-1-7/how-to-bulk-import-products-using-csv/
0 Response to "How to Bulk Upload Upc for Products Prestashop"
Post a Comment